System
System Requirements
List of supported equipment
-
Antminer E9/E9 PRO, L7, S19/S19 PRO, T19
-
Whatsminer M3, M20S, M30S+/M30S++
-
iPollo V1 Mini
Currently, only original firmware is supported. The list of supported models and firmware will be continuously expanded.
To request support for ASIC models and third-party firmware, please email us at [email protected] with the subject "ASIC Hub".
Download Image
Minimum System Requirements
-
Windows 7 or newer / Linux / MacOS
-
Intel® Core™ 2 or better / AMD am3+ or better
-
4 GB RAM
-
4 GB storage (HDD / SSD / M2 / USB)
Recommended System Requirements
-
Windows 10 or newer / Linux / MacOS
-
Intel® Core™ i3-3220 3.3 GHz / AMD FX-6300 3.5 GHz
-
8 GB RAM
-
8 GB SSD storage
Installation
To use ASIC Hub, your PC must be on the same local network as your ASIC devices.
-
Download the ASIC Hub Beta installer file.
-
Run the installer and follow the instructions.
-
After installation, navigate to the installation path, usually C:\ASIC Hub for RaveOS\asichub, and run the asichub.bat file
-
This will open a browser window at http://localhost:10081, which will be used to access the ASIC Hub interface
-
Log in to your RaveOS account on the website and go to the "Wallet" section in the left sidebar menu. Click on "Add Wallet" and enter the wallet name. Select the equipment type as "ASIC Hub" and choose the desired coin from the list. Click "Add Wallet." Next, select the mining pool, choose the preferred pool URLs, and enter your login credentials for pool authorization. Click the "Save" button.
-
Go to the "Clusters" section in the left sidebar menu.
-
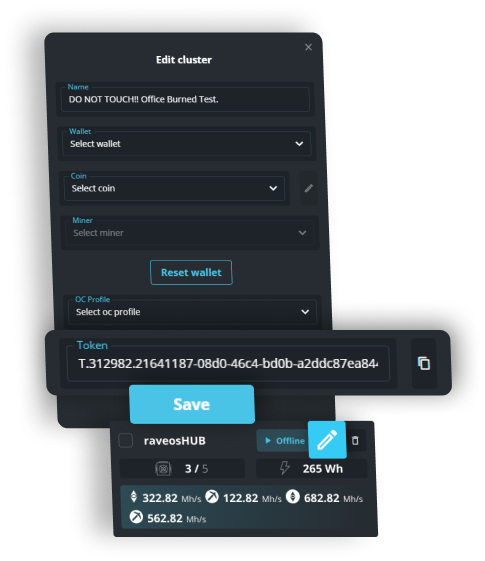
Click on "Add Cluster" and enter a name for your cluster. Select "Type of equipment: ASIC Hub" and choose the default wallet for ASIC Hub. Click on the pencil icon ("Edit Cluster") and copy the Token.
-
Return to the ASIC Hub interface at http://localhost:10081, paste your token, and click "Connect".
-
Start adding your ASICs to ASIC Hub by clicking on "+Add new Devices".
-
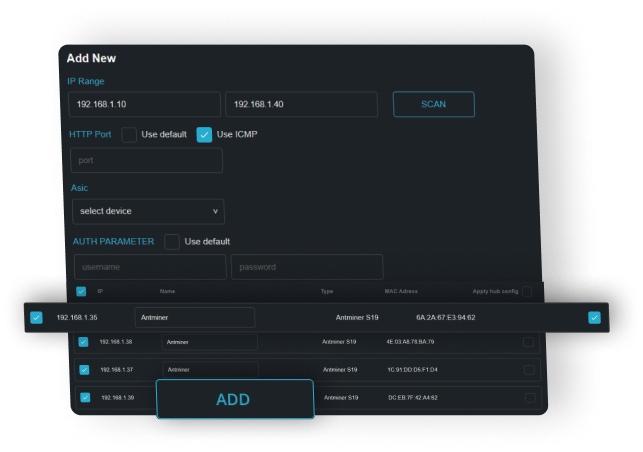
Enter the IP address range for scanning ASICs in the format 192.168.1.1. Optionally, you can specify the port for accessing the ASIC's web interface, as well as the login and password for the ASIC (if different from the default). Click "SCAN".
-
Select the desired ASIC(s) from the list by checking the boxes and give them names. The "Apply hub config" checkbox applies the default ASIC Hub wallet. If not activated, the pool and wallet settings will remain unchanged. Click "Add".
-
The added ASICs will appear on the "Devices" tab and on the dashboard in your RaveOS account.
ASIC Hub provided by our partners
ASIC Hub
ASIC Hub Functionality Description

"STATUS" Tab
-
RaveOS connection: Connection status
-
IP Address: ASIC Hub server's IP address
-
Load Average: Average system load
-
Uptime: System uptime
"DEVICES" tab
Add new: Allows you to add new devices.
-
IP Range: Specifies the range of IP addresses to scan in the network
-
HTTP Port: The port of the ASIC interface. If the port hasn't been changed and the checkbox is not activated, the default port will be used
-
USE ICMP: Enabled by default. Determines whether to use the ICMP protocol for connection
-
Asic: Allows you to select a specific ASIC model for scanning
-
Scan: Initiates the scanning process
-
The checkbox allows you to select devices to add
-
After scanning, the discovered devices will be displayed below
Information about the discovered devices includes: IP address, name, MAC address, model.
-
Apply hub config: If enabled, it uses the default ASIC Hub wallet from the "Clusters" menu. If not enabled, the pool and wallet settings on the ASIC will not be changed
-
Add: Adds the selected devices to ASIC Hub
After adding, the ASICs will be displayed on the "Devices" tab. It shows basic information and the status of the device, and there is also an option to remove a device from ASIC Hub.
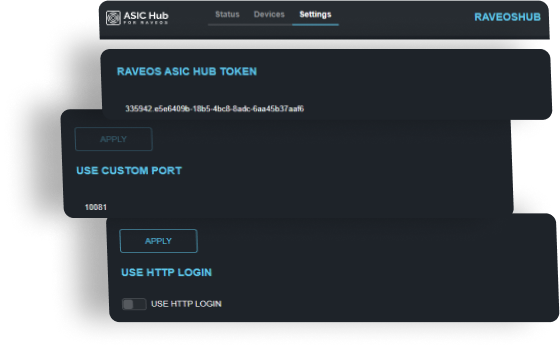
"SETTINGS" tab
-
ASIC Hub TOKEN: The token for ASIC Hub. It can be changed to another token, but in doing so, the associated ASICs will be removed and need to be added again
-
USE CUSTOM PORT: Change the default port 10081 to another port. This is useful when you need to create multiple ASIC Hubs under a single account. You change the port on the current ASIC Hub, then duplicate the folder "C:\ASIC Hub for RaveOS" with a new name, and the new ASIC Hub will run on the default port 10081. To access the old ASIC Hub, you will need to use the new specified port: "http://localhost:new_port"
-
USE HTTP LOGIN: Enable setting a login and password for ASIC Hub. By default, authentication is disabled

Creating Multiple ASIC Hubs on a Single PC
You can create multiple ASIC hubs on a single computer (server). This is useful when you have a large number of devices or want to distribute them across rooms, clients, or models.
Here's how you can do it:
-
Start by installing the first ASIC hub following the instructions at the top of the page
-
Then go to the "Settings" tab and change the port to another number, for example, 10082. Save the changes and restart the hub
-
Next, copy the "C:\ASIC Hub for RaveOS\asichub" folder with a new name, such as "asichub1". Launch the new ASIC Hub using the "asichub.bat" file from the new folder. The second hub will run on port 10081
-
To access the first (old) ASIC Hub, you will need to use the new specified port in the browser's address bar: "http://localhost:new_port"
Now you will have the ability to manage multiple ASIC hubs on a single computer.